Static sites are cool. You don’t have to worry about servers, security, maintenance, etc. This is why I like using static site generators like Hugo. I have used Hugo for quite some time now. Its fast and reliable, but I don’t like the Go-like templating structure.
Astro is just another static site generator which I am going to try out. Its HTML-first approach is really cool. Also, its UI agnostic, that is it supports different frameworks like React, Vue, Svelte, etc. Astro uses JSX instead of templates (like in Hugo), which I am more familiar with since I have used React in my projects previously.
I will be following the official Astro documentation to build my new blog site. I guess you’re reading this on my new blog ;)
According to the documentation, we need to install Node.js v18+ in order to install Astro. So I did it using nvm (node version manager). Also, we have to install npm (node package manager) which is used to install node packages (Astro is a node package).
In a new empty directory, run this command:
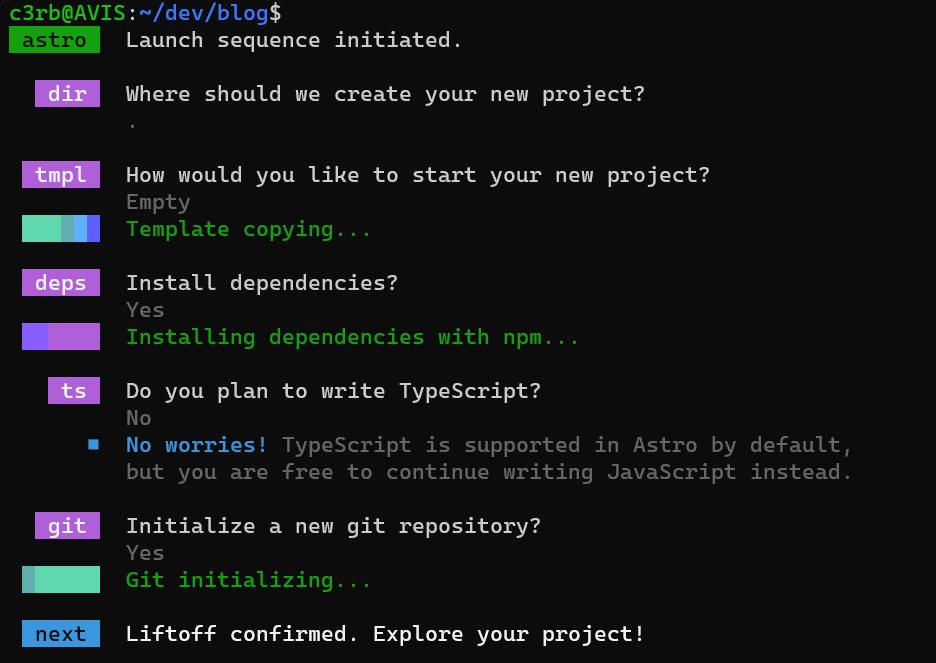
npm create astro@latest
It will run the setup wizard; Answer a couple of questions and the wizard will set up your project structure accordingly. The setup wizard looks something like this. Cools.
Note: Astro allows you to start a project with sample files or a blog template. But I chose the third one, empty installation, as I like to explore things from scratch.
Make sure you choose “Yes” on installing dependencies. If not, you can run npm install to install all the dependencies. This should create a node_modules folder. Go through the README file in the root directory of the project to learn about the available commands.
Take a look at the available astro commands by running
npm run astro -- --help
Don’t worry, the -- is not a typo. Its just how it is. We can run a development server using either of the following commands:
npm run astro dev
# OR
npm run dev
It should start a development server at http://localhost:4321/ by default.
One of the core concepts of Astro is something they call “Astro Islands” or simply component islands. These are blocks of UI components on a static HTML page.
Features of islands:
Astro converts the JavaScript into fast, static HTML. JavaScript is only loaded for individual components that need it. Isn’t that cool? Islands are the secret behind Astro’s speedy performance!
Astro’s project structure is pretty simple.
src/ contains source code - components, pages, styles, etc. Anything that needs to be processed.public/ contains unprocessed assets like fonts, images, etc.These two are the most important directories that are generated by the Astro setup wizard. You need to create separate directories to store components/, layouts/, and styles/ inside src/. Another important subdirectory under src/ is pages/. It contains layouts for each page, for example, pages/posts/ contain all blog posts.
Inside the src/pages/ directory, there should be a index.astro file which is created by the installation wizard during initial setup. Files having the .astro are called Astro components. They are the building blocks of your website. An Astro component could be any reusable UI component, like a header or a navigation, or even just a button!
If you check the index.astro component, you’ll see there are few lines of HTML. That’s the basic structure of any HTML page. All this should be copied to any page component. So, rather than copy-pasting the entire document, we can simply create a component out of it and import it as needed. I call it base.astro.
---
import Header from "../layouts/header.astro"
import Footer from "../layouts/footer.astro"
const { title } = Astro.props
---

<html lang="en">
    <head>
        <meta charset="utf-8" />
		<link rel="icon" type="image/svg+xml" href="/favicon.svg" />
        <meta name="viewport" content="width=device-width" />
        <meta name="generator" content={Astro.generator} />
        <title>{ title }</title>
    </head>
    <body>
        <Header />
        <slot />
        <Footer />
    </body>
</html>
I made a few tweaks to the contents of index.astro. As you can see I have imported two files from layouts directory - header and footer, which of course are the header and footer layouts, I don’t need to explain that to you. By the way, .astro files have a two main parts. The first part as you can see is wrapped by the --- lines which if you’re familiar with markdown, defines the frontmatter of that file. But here in Astro components, instead of frontmatter we write any JavaScript code which gets render on the server and parsed into plain HTML on the browser. Unlike normal HTML files, we can’t use the <script> tags to write JavaScript code. Because anything outside the frontmatter specifier is plain HTML - and no script shall be rendered. Here the contents of Header and Footer layouts (I’ll get to them shortly) are rendered as HTML. Its just like React components but with special powers. The third line
const { title } = Astro.props
defines an Astro props.
Astro.propsis an object containing any values that have been passed as component attributes. Layout components for.mdand.mdxfiles receive frontmatter values as props.
As you can see I have used the title prop inside the <title> tag. Its like an argument passed to a function. So, when we call base.astro in other files like index.astro, we can pass the title string to this prop. This way we can build dynamic page layouts and components. Cool.
The <slot /> element is a placeholder. When we import the layout in another file, we can put custom HTML content between this component. The external HTML will replace the <slot /> tag.
<!-- index.html -->

---
import Base from "./base.astro";
const pageHeader = "Home";
---

<Base title = {pageHeader}>
<!-- any cool stuff here will replace <slot /> -->
</Base>
As you can see, I created a constant pageHeader and passed the name of the page in the frontmatter. Then I assigned the value of this constant to the title prop of base.astro. With the base layout, I created two more pages - blog.astro and about.astro. Nothing much in the about page, just a small paragraph and a nice header. Whereas in the blog page, I did something interesting. As we saw earlier, we can create content dynamically using JavaScript, which renders into static HTML in the client.
I want to list all the blog posts (which reside in src/pages/posts directory as plain markdown files). We can achieve this by using the Astro.glob() function. It allows you to import multiple files at once. It takes the relative glob pattern (path to the folder and the regex to match the filenames) to the folder where all the files are stored, here it should be ./posts/*.md*. We can then create a map of all pages and iterate through it to create a list.
<!-- blog.astro -->

---
import Base from "../layouts/base.astro";
const pageHeader = "Blog";
const allPosts = await Astro.glob("./posts/*.md");
---

<Base title={pageTitle}>
  <h2>{pageHeader}</h2>
  <!-- List all blogs -->
  <ul>
    {
      allPosts.map((post) => (
        <li>
          <a href={post.url}>{post.frontmatter.title}</a>
        </li>
      ))
    }
  </ul>
</Base>
As for the header and footer, I have kept them pretty simple for now. The header has a heading tag and a navigation component. The footer contains just a paragraph to display the copyright information.
<!-- header.astro -->

---
import Navigation from "../components/navigation.astro";
---

<header>
    <h1>Shounak Das</h1>
    <Navigation />
</header>
<!-- footer.astro -->
<footer>
<p>Shounak Das © 2023</p>
</footer>
The navigation component is pretty simple. I could have made it dynamic, but its not necessary. Don’t make something dynamic just because it looks cool. Do so only when the content might be changing frequently. The pages of my blog are fixed. Even if I add a new page about something, let’s say projects, I can just edit this component once. Got the point?
<nav>
  <ul>
    <li><a href="/">Home</a></li>
    <li><a href="/blog">Blog</a></li>
    <li><a href="/about">About</a></li>
  </ul>
</nav>
The blog post pages are basic markdown files. So, if you visit any post, you won’t notice any of the components (header, footer, etc.) we included in other pages. To do that we need to create a content collection. To do so, all the markdown files need to be moved from src/pages/posts to src/content/posts. Then, create a src/content/config.ts. This file will automatically load and configure collections. My config.ts looks something like this right now:
// config.ts

// 1. Import utilities from `astro:content`
import { z, defineCollection } from 'astro:content';

// 2. Define a `type` and `schema` for each collection
const blogCollection = defineCollection({
    type: 'content',
    schema: z.object({
        isDraft: z.boolean(),
        title: z.string(),
        description: z.string(),
        sortOrder: z.number(),
        image: z.object({
            url: z.string(),
            alt: z.string(),
        }),
        author: z.string().default('Anonymous'),
        language: z.enum(['en', 'es']),
        tags: z.array(z.string()),
        // An optional frontmatter property. Very common!
        // footnote: z.string().optional(),
        // In frontmatter, dates written without quotes around them are interpreted as Date objects
        publishDate: z.date(),
        // You can also transform a date string (e.g. "2022-07-08") to a Date object
        // publishDate: z.string().transform((str) => new Date(str)),
        // Advanced: Validate that the string is also an email
        // authorContact: z.string().email(),
        // Advanced: Validate that the string is also a URL
        canonicalURL: z.string().url(),
    })
})

// 3. Export a single `collections` object to register your collection(s)
export const collections = {
    'blog': blogCollection,
};
The markdown files won’t generate pages automatically since I moved them to a collection. To fix this a src/pages/posts/[...slug].astro and src/layouts/markdown_post_layout.astro need to be created. The first one will generate the blog pages. The other one defines the layout of the post page. For now, I just included the components, will do the styling later.
<!-- markdown_post_layout.astro -->

---
import Base from "./base.astro"
const {frontmatter} = Astro.props;
---

<Base title={frontmatter.title}>
    <h1>{frontmatter.title}</h1>
    <h2>{frontmatter.description}</h2>
    <h3>{frontmatter.publishDate.toString().slice(0,10)}</h3>
    <img src={frontmatter.image.url} alt={frontmatter.image.alt} />
    <slot />
</Base>
We have to extract the content and the frontmatter data and put that in the markdown layout.
<!-- [...slug].astro -->
---
import { getCollection } from "astro:content";
import MarkdownPostLayout from "../../layouts/markdown_post_layout.astro";

export async function getStaticPaths() {
  const blogEntries = await getCollection("posts");
  return blogEntries.map((entry) => ({
    params: { slug: entry.slug },
    props: { entry },
  }));
}

const { entry } = Astro.props;
const { Content } = await entry.render();
---

<MarkdownPostLayout frontmatter={entry.data}>
  <Content />
</MarkdownPostLayout>
On the Blog page (src/pages/blog.astro/), we need to replace Astro.glob() with getCollection() as the way to fetch content and metadata from the Markdown files. Also, the references to the data returned for each post need to be updated. The frontmatter values are now stored in the data property of each object, and the collections on each post object will have a slug instead of the full URL.
<!-- blog.astra -->

---
import Base from "../layouts/base.astro";
import { getCollection } from "astro:content";
const pageHeader = "Blog";
const allBlogPosts = await getCollection("posts");
---

<Base title={pageTitle}>
  <h2>{pageHeader}</h2>
  <!-- List all blogs -->
  <ul>
    {
      allBlogPosts.map((post) => (
        <li>
          <a href={`/posts/${post.slug}`}>{post.data.title}</a>
        </li>
      ))
    }
  </ul>
</Base>
This might be a little confusing to understand without knowing the structure of each post object returned by getCollection(). If you console.log() the output (allBlogPosts), you will see the object structure in your terminal where you’re running the dev server. Here’s a sample post object.
{
    id: 'blog-title.md',
    slug: 'blog-title',
    body: '# Blog Header\n\nBlog content...',
    collection: 'posts',
    data: {
      title: 'Blog Title',
      publishDate: 2022-07-01T00:00:00.000Z,
      description: 'This is the description of the blog post.',
      author: 'Astro Learner',
      image: [Object],
      tags: [Array]
    },
    render: [AsyncFunction: render]
}
In short, the steps to dynamically generate pages from markdown are:
- fetch data about all your blog posts using
getCollection("posts")instead of usingAstro.glob()- access all frontmatter values using
datainstead offrontmatter- create a page URL by adding the post’s
slugto the/posts/path
Right now, my blog looks…ok doesn’t look anything…need to add some CSS first. I’ll use Tailwind CSS as always. Its the coolest CSS framework out there. You literally don’t need to write CSS to do CSS, yes - that’s the most chad thing ever!
The other astro thing about Astro is that it has the astro CLI tool which enables us to do good stuff easily. Like we can install Tailwind CSS by running:
npx astro add tailwind
This tool will also update the config files for you. So sit back and enjoy your cup of coffee while Tailwind gets installed. So cool.
Now you can customize your blog page as you like. I don’t want to make this any longer so I will skip the CSS part (anyways, CSS is easy, I know you can do it on your own). That’s it. We are done. My new blog is finally complete (you’re reading this post probably in this new blog made with Astro XD).
84ck_783_914n37